

What this guide covers
This handbook walks you through how to start an SMM panel from zero and how to run it well once it is live. It is written for beginners who have never owned an online store, for resellers who already buy services from other panels, and for existing panel owners who want a cleaner way of working.
- Chapters 1–2PlanModel, niche, name
- Chapters 3–6BuildSetup, services, payments, site
- Chapters 7–9RunOrders, support, API
- Chapters 10–13GrowSEO, policies, security, scale
The page you are reading is the overview. It explains the whole journey in the order you will actually experience it, gives a short summary of every chapter, and links to each one so you can go deeper when you reach that step. At the end you will find a startup checklist, a realistic timeline and links to the glossary and FAQ.
If you are completely new to the concept, read what an SMM panel is first, then come back here.
- Steps 1–2: decide what you are building and what it will be called.
- Steps 3–6: set up the panel, fill the catalog, connect payments and design the website.
- Steps 7–9: run daily operations, support customers and open your API to resellers.
- Steps 10–13: get found on Google, protect yourself legally and technically, then grow.
How an SMM panel business works
Before the steps, it helps to have the whole model in one picture. An SMM panel is an online shop where customers buy social media services: followers, likes, views, comments, channel members, playlist plays and similar items. Customers usually top up a balance first, then spend that balance on orders.
Most panel owners do not produce these services themselves. They connect one or more providers, which are wholesale panels that expose an API. When a customer places an order on your panel, your panel forwards it to the provider through the standard SMM API v2, the provider fulfils it, and your panel keeps syncing the status until the order is complete. Your income is the difference between what the customer paid you and what the provider charged you.
That means the business is less about technology and more about four things:
- Choosing reliable providers and pricing their services sensibly.
- Taking payments in ways your target customers trust.
- Handling problems such as drops, partial deliveries, refills and refunds without losing customers.
- Getting traffic, whether from search, communities, resellers or referrals.
Everything in this guide is organised around making those four things work. For a quick view of the money side, the pricing and margins article and the profit calculator are good companions.
Social platforms have their own terms of service, and many of them restrict artificial engagement. Read the legal chapter before you launch, write honest service descriptions, and never promise customers that anything is risk-free.
Step 1: Plan the business
A panel without a plan usually becomes a copy of a hundred other panels with the same services and slightly different prices. Planning does not need to take weeks, but you should answer a few questions in writing before you spend money.
- Who is your customer? Influencers buying for their own accounts, agencies buying in bulk, resellers who need an API, or a specific country or language group.
- What do you sell first? A focused catalog for two or three platforms is easier to manage than 3,000 imported services.
- How will customers pay? Card, local payment methods, crypto or bank transfer change who can buy from you.
- What is your budget? Platform fees, domain, a small starting balance at your provider and some marketing money.
- How will people find you? SEO, Telegram and Discord communities, YouTube, reseller networks or paid ads.
The planning chapter turns these questions into a one-page business plan, with a simple cost sheet and an example break-even calculation. If budget is your main concern, read the cheapest way to start an SMM panel and try the cost calculator.
Step 2: Choose a name, brand and domain
Your name is what customers type into Google, mention in groups and remember when they come back to reorder. A good panel name is short, easy to spell, not tied to a single platform's trademark and available as a domain.
Things to decide in this step:
- Name style: descriptive (it contains "SMM" or "panel"), brandable (a made-up word) or a mix.
- Domain: a
.comis easiest to remember globally; country domains can help in local markets. - Trademark caution: avoid using platform names such as social network brands as the main part of your domain. It can cause problems with payment providers and with the platforms themselves.
- Visual identity: a simple logo, two brand colours and one font are enough at the start.
You can start on a free subdomain and move to your own domain later, but changing a name after you have customers and search rankings is painful, so choose carefully now. The name and domain chapter includes a naming checklist, examples of good and weak names, and how to connect a custom domain.
Step 3: Set up the panel
There are three common ways to get the software: write your own, buy a self-hosted script, or rent a hosted panel. Writing your own takes months. A self-hosted script means you handle the server, updates, backups and security yourself, and pirated scripts carry serious risks (nulled script risks explains why). A hosted, rented panel lets you focus on the business while the platform handles hosting and updates. The script vs rental comparison lays out the trade-offs.
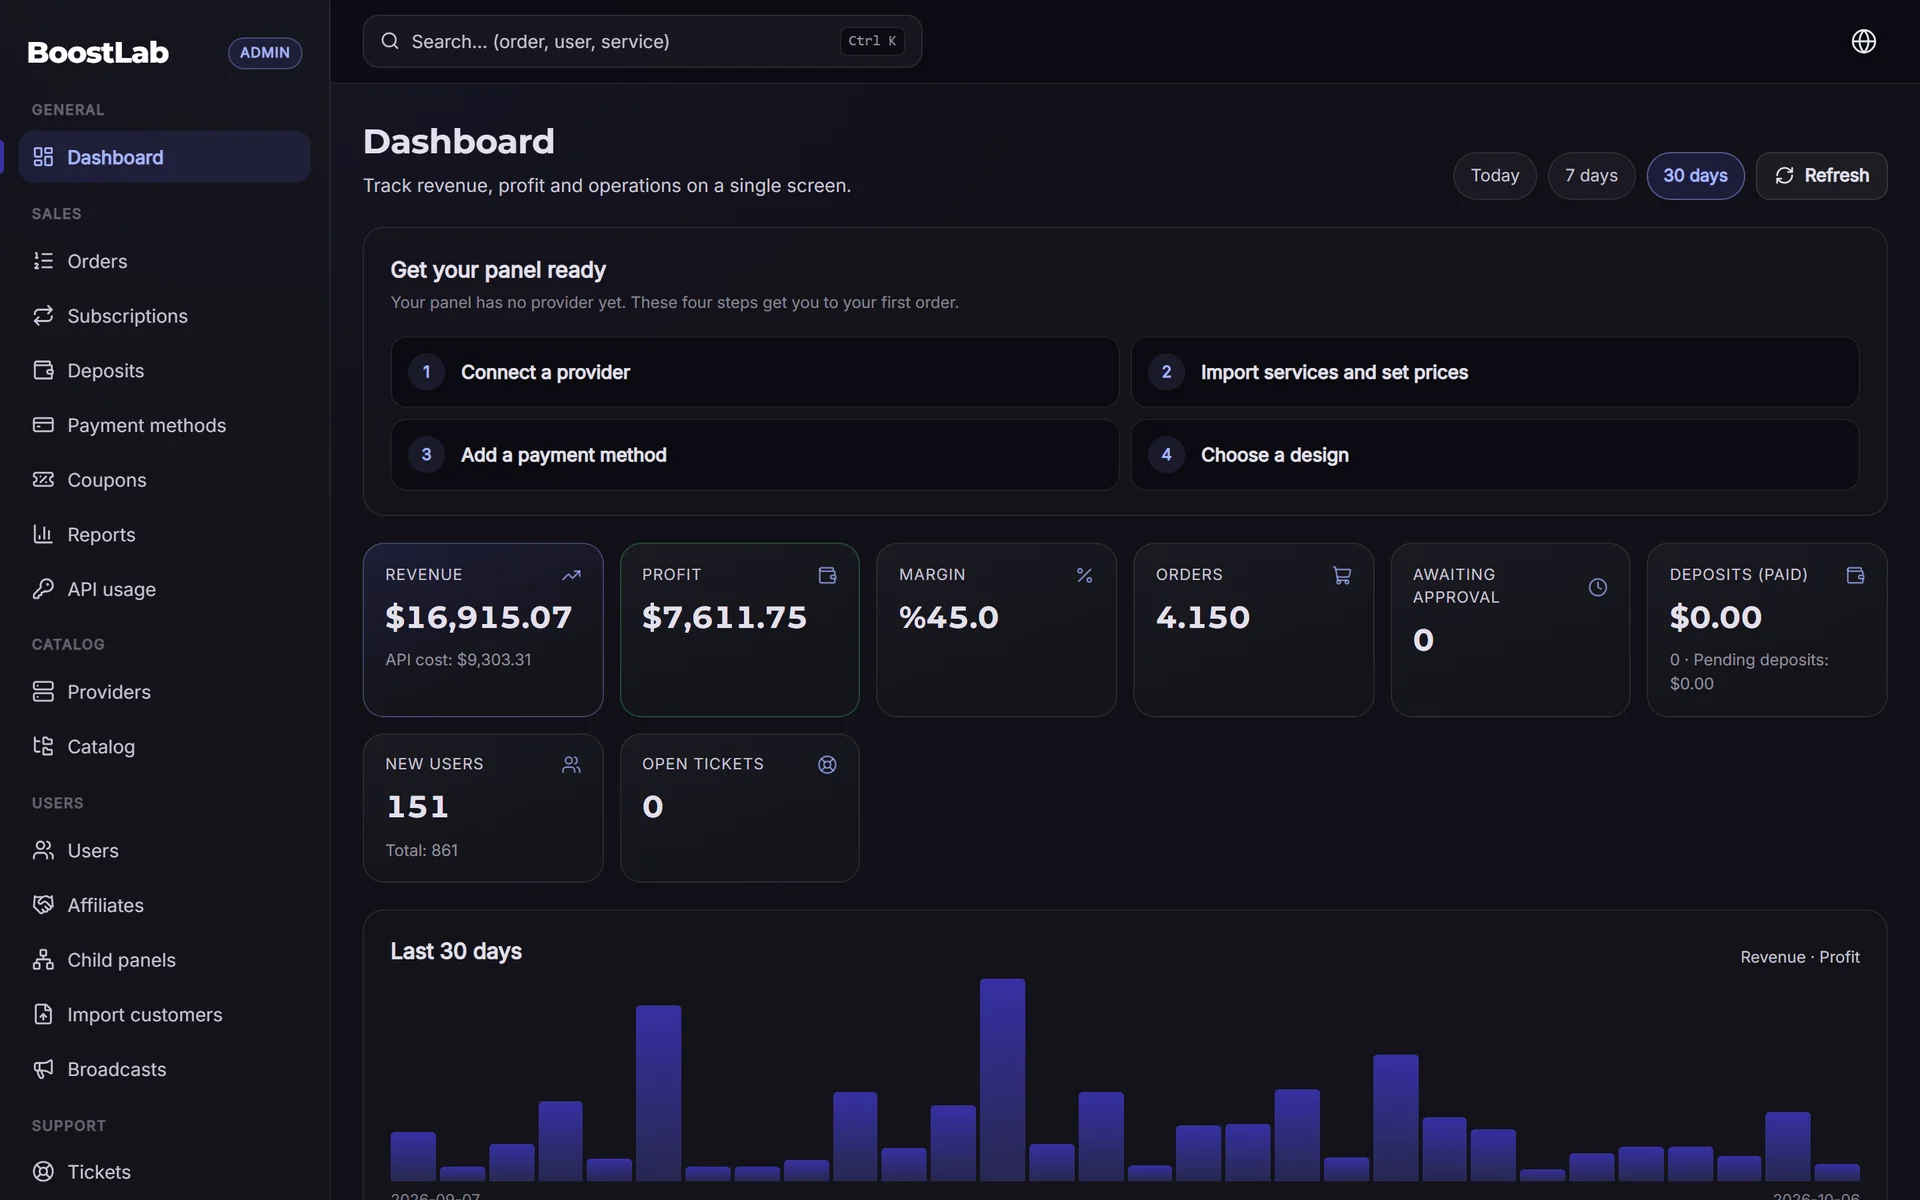
On SMMFor, setup looks like this:
- Create an account at smmfor.com/signup and pick a panel name.
- Your panel goes live on a free subdomain such as
yourname.smmfor.com. - Optionally connect your own domain; it runs through Cloudflare with SSL included.
- Set the panel currency, time zone, languages and basic settings.
- Secure your admin account with two-factor authentication.
Plans are Starter at $19, Pro at $39 and Business at $79 per month, and yearly billing costs ten times the monthly price. There is a 3-day free trial, after which the first month is $1 on any plan; see pricing for the current details. The setup chapter covers every setting in order, including the ones beginners forget.
Step 4: Add providers and build your service catalog
The catalog is the product. Customers judge your panel by how clear your service names are, how accurate your descriptions are and how reliably orders complete.
The usual workflow:
- Pick providers. Test several with small orders before trusting one. How to choose an SMM provider explains what to look for.
- Connect them by API. Any provider that offers the standard SMM API v2 can be connected with its API URL and key.
- Import selectively. Pick the services you want instead of importing everything.
- Rename and describe. Write clear names, start times, speeds, drop expectations and refill terms.
- Set prices. Apply a margin per category, round prices, and keep an eye on provider price changes.
- Organise categories. Group by platform and then by service type so customers find things quickly.
The services and catalog chapter shows a naming template, a pricing table with example margins, and how to handle drip-feed, refill and cancel options. For the mechanics of those three features, the drip-feed, refill and cancel guide is a good reference.
Step 5: Connect payment methods
If customers cannot pay the way they prefer, nothing else matters. Payment choice depends heavily on your market: card processors suit some regions, local wallets and bank transfers dominate others, and many SMM buyers prefer crypto.
SMMFor includes more than 17 built-in gateways, among them Stripe, PayPal, Paddle, PayTR, iyzico, Shopier, Papara, Paywant, Binance Pay, Heleket, Cryptomus, NOWPayments, Plisio, CoinPayments, Payop, Payeer and Perfect Money, plus manual or bank transfer methods. The money goes straight into your own gateway accounts, not through the platform.
Key decisions in this step:
- Which two or three methods cover most of your target customers.
- Minimum deposit amounts and whether to offer deposit bonuses.
- How you will handle manual payments and their confirmation.
- Which gateways actually accept your business model; read each provider's terms before applying.
The payment methods chapter compares options by region, explains fees and chargeback risk, and gives a setup checklist. See also payment gateways and crypto payments.
Step 6: Design your storefront
Your website has two jobs: convince a first-time visitor to register, and make it fast for a returning customer to place an order. Most panels get the second part right and neglect the first.
What a good storefront includes:
- A clear homepage that says what you sell, to whom, and how payment works.
- A public services or price list page that search engines can read.
- Trust pages: terms, refund policy, contact and FAQ.
- A customer dashboard that is fast on mobile, because many orders are placed from phones.
- Optional extras such as a blog, multiple languages and an installable mobile app experience.
SMMFor offers 20 ready storefront designs (18 on Pro, all 20 on Business), a block page builder, extra pages, a blog, a multi-language storefront, customer dashboard themes and a mobile PWA. You can browse them on the designs page. The website design chapter explains page structure, copy that converts without overpromising, and a pre-launch design review.
Step 7: Run daily order operations
Once orders start, your daily routine becomes the business. Order management covers watching statuses, catching stuck or failed orders, processing refills and cancels, issuing partial refunds and keeping provider balances topped up.
A simple daily routine might be:
- Check orders that have been pending or in progress longer than usual.
- Review failed orders and decide whether to resend, switch provider or refund.
- Process refill and cancel requests.
- Top up provider balances before they run low.
- Check for provider price changes that affect your margins.
SMMFor syncs orders with providers automatically and supports refill and cancel requests and partial refunds on every plan, which removes most of the manual checking. The order management chapter gives a daily and weekly checklist, explains each order status and shows how to handle the most common problems.
Step 8: Set up customer support
SMM customers ask the same questions again and again: when will my order start, why did my count drop, can I get a refill, where is my deposit. Good support is mostly about answering these quickly and consistently.
- Use a ticket system for anything tied to an order, so there is a record.
- Prepare saved replies for the ten most common questions.
- Publish clear refill and refund rules so support answers are not arguments.
- Set response time expectations you can actually meet.
- Decide which channels you will offer: tickets, email, Telegram or live chat.
The customer support chapter includes ready-to-adapt reply templates, an escalation process for provider issues and tips for handling difficult customers. If you plan to add staff later, it also explains how to split work with roles.
Step 9: Open your API to resellers
Many of the biggest buyers in this market are other panel owners and agencies. They do not order by hand; they connect to your panel with an API key, exactly like you connect to your providers. Offering a reliable customer API can turn a few resellers into a meaningful share of your volume.
Things to prepare:
- A public API documentation page with your service IDs and example requests.
- Reseller pricing, either through special customer rates or a separate price group.
- Rate limits and fair-use rules so one reseller cannot overload your panel.
- Child panels: small panels you sell to your own resellers, connected back to you.
SMMFor includes a customer API v2 and child panels on its plans; details are on the API features page. The API and resellers chapter explains how to attract resellers, how to price for them and what to watch out for.
Step 10: Get found on Google
Search traffic is slow to build but valuable, because people searching for a specific service are ready to buy. SMM keywords are competitive, so a panel that only has a homepage will struggle.
The basics:
- Pick a realistic set of keywords: service plus platform, service plus country, and long-tail questions.
- Create a page for each important service group, with original descriptions.
- Write helpful blog posts that answer questions your customers ask.
- Make sure the site is fast, works on mobile and has correct titles and meta descriptions.
- Build links honestly, through partnerships, directories and useful content.
The SEO chapter explains keyword research for panels, on-page structure, multi-language SEO and how to measure progress with Search Console. It is realistic about timelines: expect months, not days.
Step 11: Cover the legal side and write your policies
This step is not exciting, but skipping it causes real problems with payment providers, customers and sometimes authorities. You are running an online business, and the normal rules apply.
- Business registration and tax: check what your country requires for online sales.
- Terms of service: what you sell, what you do not guarantee, and how disputes are handled.
- Refund policy: when balance is refunded, when money is returned, and when neither applies.
- Privacy policy: what data you collect and why.
- Platform terms: make customers aware that social platforms may restrict bought engagement.
The legal and policies chapter gives a checklist of documents, the clauses most panels need and common mistakes. It is general information, not legal advice; for your specific situation, talk to a local professional.
Step 12: Secure your panel
A panel holds customer balances, provider API keys and payment gateway credentials. That makes it a target for account takeovers, fraudulent deposits and staff mistakes.
Minimum security measures:
- Enable two-factor authentication for the admin and every staff account.
- Give staff only the roles they need.
- Keep provider and gateway keys private and rotate them if anyone leaves.
- Watch for suspicious deposit and order patterns.
- Know how backups work and how you would recover.
On SMMFor, panels are isolated from each other, provider keys are stored encrypted, and there are 2FA, roles, audit logs and automatic backups. The security chapter covers fraud patterns specific to SMM panels, a staff access policy and an incident checklist.
Step 13: Grow the business
Growth in this market usually comes from a mix of retention and new channels. Keeping existing customers ordering is cheaper than finding new ones, so start there.
Growth levers worth testing:
- Referral and affiliate programs that reward customers for bringing others.
- Coupons and deposit bonuses for specific campaigns, not permanent discounts.
- Multi-currency display so international customers see familiar prices.
- Telegram: a bot or Mini App so customers can order without opening the website.
- Drip-feed and subscriptions for customers who want steady, recurring delivery.
- Resellers and child panels to multiply your reach.
- Automation rules and webhooks to remove repetitive admin work.
The growth chapter explains how to choose which lever to pull first, how to measure it and how to avoid discount wars. For customer acquisition ideas, read how to get customers for an SMM panel. Related features: Telegram bot and multi-currency.
Your startup checklist
Use this table to track your progress. The order matters: each row assumes the ones above it are done.
| # | Task | Chapter | Done when |
|---|---|---|---|
| 1 | Write a one-page plan with target customers, first platforms and budget | Plan | You can explain your niche in one sentence |
| 2 | Choose a name and register a domain | Brand | Domain is registered and the name is checked against trademarks |
| 3 | Open the panel and set basic settings | Setup | Panel loads on your subdomain or domain, 2FA is on |
| 4 | Test two or more providers with small orders | Services | You have at least one reliable provider per platform you sell |
| 5 | Import, rename and price your first services | Services | Each service has a clear name, description and margin |
| 6 | Connect at least two payment methods | Payments | A test deposit arrives in your account |
| 7 | Choose a design and write homepage copy | Storefront | A stranger understands what you sell in ten seconds |
| 8 | Publish terms, refund and privacy policies | Legal | Policies are linked in the footer |
| 9 | Prepare support replies and channels | Support | Saved replies exist for the top ten questions |
| 10 | Place real test orders end to end | Operations | Deposit, order, sync and completion all work |
| 11 | Publish API docs and reseller terms | API | A reseller could connect without asking you |
| 12 | Set up Search Console and core pages | SEO | Sitemap submitted, key pages indexed |
| 13 | Review staff access and fraud rules | Security | Every account has the minimum role it needs |
| 14 | Launch one growth channel and measure it | Growth | You know where your first customers came from |
A realistic timeline
How long it takes to start an SMM panel depends more on your decisions than on the software. With a hosted platform the technical part is fast; choosing providers, writing content and finding customers take longer. The timeline below is an example for one person working part-time, not a promise.
- Open the panel
- Connect one provider
- Import 20–40 services
- Payment method live
- Test orders & descriptions
- Terms & refund policy
- First real customers
- Support routine
- First SEO pages & blog
Day 1: get the panel online
- Sign up and open the panel on a free subdomain.
- Set currency, language and time zone, and turn on 2FA.
- Connect one or two providers and fund them with a small test balance.
- Import a handful of services for one platform and set temporary prices.
- Pick a storefront design.
At the end of day one you have a working panel, but not a business yet. Do not announce it publicly until test orders have gone through.
Week 1: make it trustworthy
- Test providers with small real orders and drop the ones that underdeliver.
- Rewrite service names and descriptions, and finalise pricing.
- Connect your payment methods and complete a real test deposit.
- Connect your own domain if you have one.
- Publish terms, refund policy, privacy policy and an FAQ.
- Prepare saved support replies.
- Invite a few people you know to try it and give feedback.
Month 1: start acquiring customers
- Expand the catalog to the platforms your first customers actually ask for.
- Set up Search Console, write your first service pages and blog posts.
- Pick one or two acquisition channels and stay consistent with them.
- Launch a referral program or a modest first-deposit bonus.
- Publish your API documentation and approach a few resellers.
- Review numbers weekly: deposits, orders, failed orders, refunds, and where customers came from.
After the first month you should know which services sell, which providers you trust and which channel brings customers. From there, the growth chapter becomes your main reference.
A common mistake is spending the first month perfecting design and importing thousands of services. A small, accurate catalog and a working payment flow beat a large, messy one.
Common beginner mistakes
- Importing everything. Thousands of unclear services confuse customers and make support harder.
- Pricing only by undercutting. The cheapest panel attracts the least loyal customers and leaves no room for refunds.
- Relying on one provider. When it has issues, every order stops. Keep a backup for key services.
- Unclear refill and refund rules. Vague rules create disputes; write them down and link them.
- Promising guarantees. Never promise results, safety or permanence; you do not control the platforms.
- Skipping legal pages. Payment providers often check for terms and refund policies.
- Ignoring security. One compromised admin account can empty customer balances.
- No traffic plan. A panel nobody visits earns nothing, however good it looks.
Choosing how to start
If you are still deciding between building, buying a script or renting, this table summarises the trade-offs for a typical beginner.
| Option | Time to launch | Technical work | Ongoing maintenance | Best for |
|---|---|---|---|---|
| Build your own software | Months | Very high | You do everything | Developers with a specific idea |
| Self-hosted script | Days to weeks | Medium to high | Server, updates, backups, security | People comfortable running servers |
| Hosted rental panel | Minutes to hours | Low | Handled by the platform | Beginners and owners who want to focus on sales |
The SMM panel rental page and the start an SMM panel business page describe the hosted route in more detail. If you already run a panel on another script, migration help is available.
When you are ready, you can open a panel on SMMFor and follow the chapters as you go.
Glossary and FAQ
The SMM panel world has its own vocabulary: provider, drip-feed, refill, drop, child panel, API v2, partial, average time and more. If a term in any chapter is unclear, the SMM panel glossary explains it in plain language.
For quick answers to the questions beginners search most, such as cost, legality, time needed and whether you need technical skills, see the SMM panel FAQ.
All chapters
- How to plan an SMM panel business
- Choosing a name and domain
- SMM panel setup, step by step
- Services and catalog
- Payment methods
- Website design
- Order management
- Customer support
- API and resellers
- SEO for SMM panels
- Legal and policies
- Security
- Growing your panel
- Glossary
- FAQ
Next step
Start with the planning chapter. An hour spent on a clear plan saves weeks of rework later. When your plan is ready and you want a panel to build on, you can start your SMMFor panel with a 3-day free trial and follow this guide step by step.