

SMM Panel Setup Step by Step: From Signup to First Order
This is the hands-on chapter. Follow the steps in order and you will go from an empty account to a working SMM panel that has completed a real test deposit and a real test order.
In this chapter:
- What to prepare before you start
- Creating your account and your panel
- Logging in to the admin and securing it
- General settings: name, logo, languages and currency
- Connecting a provider with its API key
- Importing a small set of services and setting prices
- Adding one payment method
- Making a test deposit and a test order
- A launch checklist before you tell anyone about your panel
Before you start
Setting up takes roughly an afternoon if you have everything ready. Gather these first:
- 1Create account
- 2Create the panel
- 3Brand & settings
- 4Connect provider
- 5Import services
- 6Add payment method
- 7Test order
- 8Launch
- Your panel name and, optionally, a domain. If you have not chosen them yet, see choosing an SMM panel name and domain. You can start on the free subdomain and add a domain later.
- A logo and an icon, even simple ones. You can replace them at any time.
- At least one provider account that offers the standard SMM API v2, with a small balance on it. The smmfor.com post on how to choose an SMM provider helps you pick one.
- Access to one payment method you want to offer, such as a payment gateway merchant account, or simply bank details for a manual transfer method.
- An authenticator app on your phone for two-factor authentication.
- An email sending service (your own SMTP or a transactional email provider) if you want your panel to send emails from your own address.
Keep a simple text file of every account you create during setup (registrar, provider, gateway) and store it in a password manager. You will need these details again.
Step 1: Create your account
- Go to smmfor.com/signup.
- Register with an email address you check daily. This is where platform notices and billing emails will arrive.
- Confirm your email address from the message you receive. Some actions, such as connecting a custom domain, require a confirmed email.
- Choose a plan. Starter, Pro and Business all include unlimited orders, services and customers; they differ in features such as the number of designs, staff accounts and white label. There is a 3-day free trial, then the first month is $1 on any plan. Details are on the pricing page.
If you are unsure which plan you need, start with the one that covers what you need in the first three months. You can review the choice once your panel has traffic.
Step 2: Create your panel
- From the platform dashboard, create a new panel.
- Enter your panel name. This appears on your storefront, emails and the installable app.
- Choose your subdomain, for example
yourname.smmfor.com. Your panel is reachable at this address immediately, and it keeps working even after you connect your own domain. - Open the panel. You will see three parts that are worth knowing from the start:
| Part | What it is | Who uses it |
|---|---|---|
| Storefront (site) | Home page, services list, API page, blog and custom pages | Visitors and potential customers |
| Customer panel | New order, mass order, orders, add funds, tickets, API key | Your registered customers |
| Admin | Orders, providers, catalog, payments, appearance, settings | You and your staff |
Step 3: Log in to the admin and secure it
Your admin area lives under your panel address, in the admin section. Before you configure anything else, protect it:
- Turn on two-factor authentication (2FA) for your admin account. Several sensitive actions, such as saving payment credentials or changing the email setup, ask for 2FA.
- Use a unique, long password that you do not use anywhere else.
- Do not share your owner login. If someone helps you, create a separate staff account with a limited role instead. Staff accounts are available on Pro (3 staff) and Business (unlimited).
More on this in the security chapter.
Step 4: General settings
Work through the settings once now, then refine them later. Focus on what a customer will see in their first visit.
Identity
- Panel name and short description.
- Logo and favicon. The favicon (or your initial) also becomes the icon of your panel's installable mobile app.
- Support contact details: the channels you will actually answer.
Languages
- Choose the default language of your storefront and customer panel.
- Add other languages only if you can keep them complete. A half-translated site looks less trustworthy than a single-language one.
Currency
- Decide the currency your prices and balances are based on. Most providers bill in USD, so many panels keep USD as the base.
- If your customers think in another currency, use multi-currency display so they see prices in their own currency. See multi-currency.
- Remember that payment methods can charge in a specific currency; you will set that per method in Step 7.
- Connect your own email sending service so password resets, deposit confirmations and ticket replies come from your brand.
- Send a test email to yourself and check that it does not land in spam.
Look
- Apply one of the ready designs so the storefront does not look empty during testing. You can change it any time; the website design chapter covers this in depth.
Step 5: Connect a provider
A provider is the wholesale panel that actually delivers your orders. Your panel talks to it over the standard SMM API v2.
- Log in to your provider account and find its API page. Copy the API URL and your API key.
- In your admin, open Providers and add a new provider.
- Paste the API URL and the API key, and give the provider an internal name you will recognise.
- Save. The panel checks the connection and shows the provider balance if the details are correct. Provider keys are stored encrypted.
If the connection fails
| Symptom | What to check |
|---|---|
| Invalid key error | Copy the key again without spaces; regenerate it at the provider if needed |
| Wrong URL | Use the API endpoint from the provider's API page, not its home page |
| Balance shows zero | Normal if you have not topped up yet; add a small amount before test orders |
| Services list empty | The provider may restrict API access on new accounts; contact their support |
Never paste your provider API key in chat groups, screenshots or support tickets to third parties. Anyone with the key can spend your provider balance.
Step 6: Import a few services and set prices
Resist the urge to import thousands of services on day one. A small, clean catalog is easier to test, describe and support.
- Open Catalog in the admin and choose to import categories from your provider.
- Pick a handful of categories that match your niche, for example one platform and three or four service types.
- Review the imported services. Services are grouped by platform, and category names are cleaned of provider branding.
- Set prices. You can use a default markup in settings and override it per service when needed.
- Edit each service name and description so a customer understands start time, speed, refill and limits.
Pricing a test catalog
An example of how a default markup works, with invented numbers:
| Service (example) | Provider cost per 1000 | Markup | Your price per 1000 |
|---|---|---|---|
| Telegram post views | $0.20 | 100% | $0.40 |
| Instagram likes | $0.90 | 60% | $1.44 |
| YouTube views | $2.50 | 40% | $3.50 |
Lower-priced services often need a higher percentage markup to cover gateway fees and support time. For a deeper look at pricing, read SMM panel pricing and margins. The full catalog topic, including descriptions and organising categories, is in the services and catalog chapter.
Step 7: Add one payment method
Start with one method your target customers already use. You can add more later.
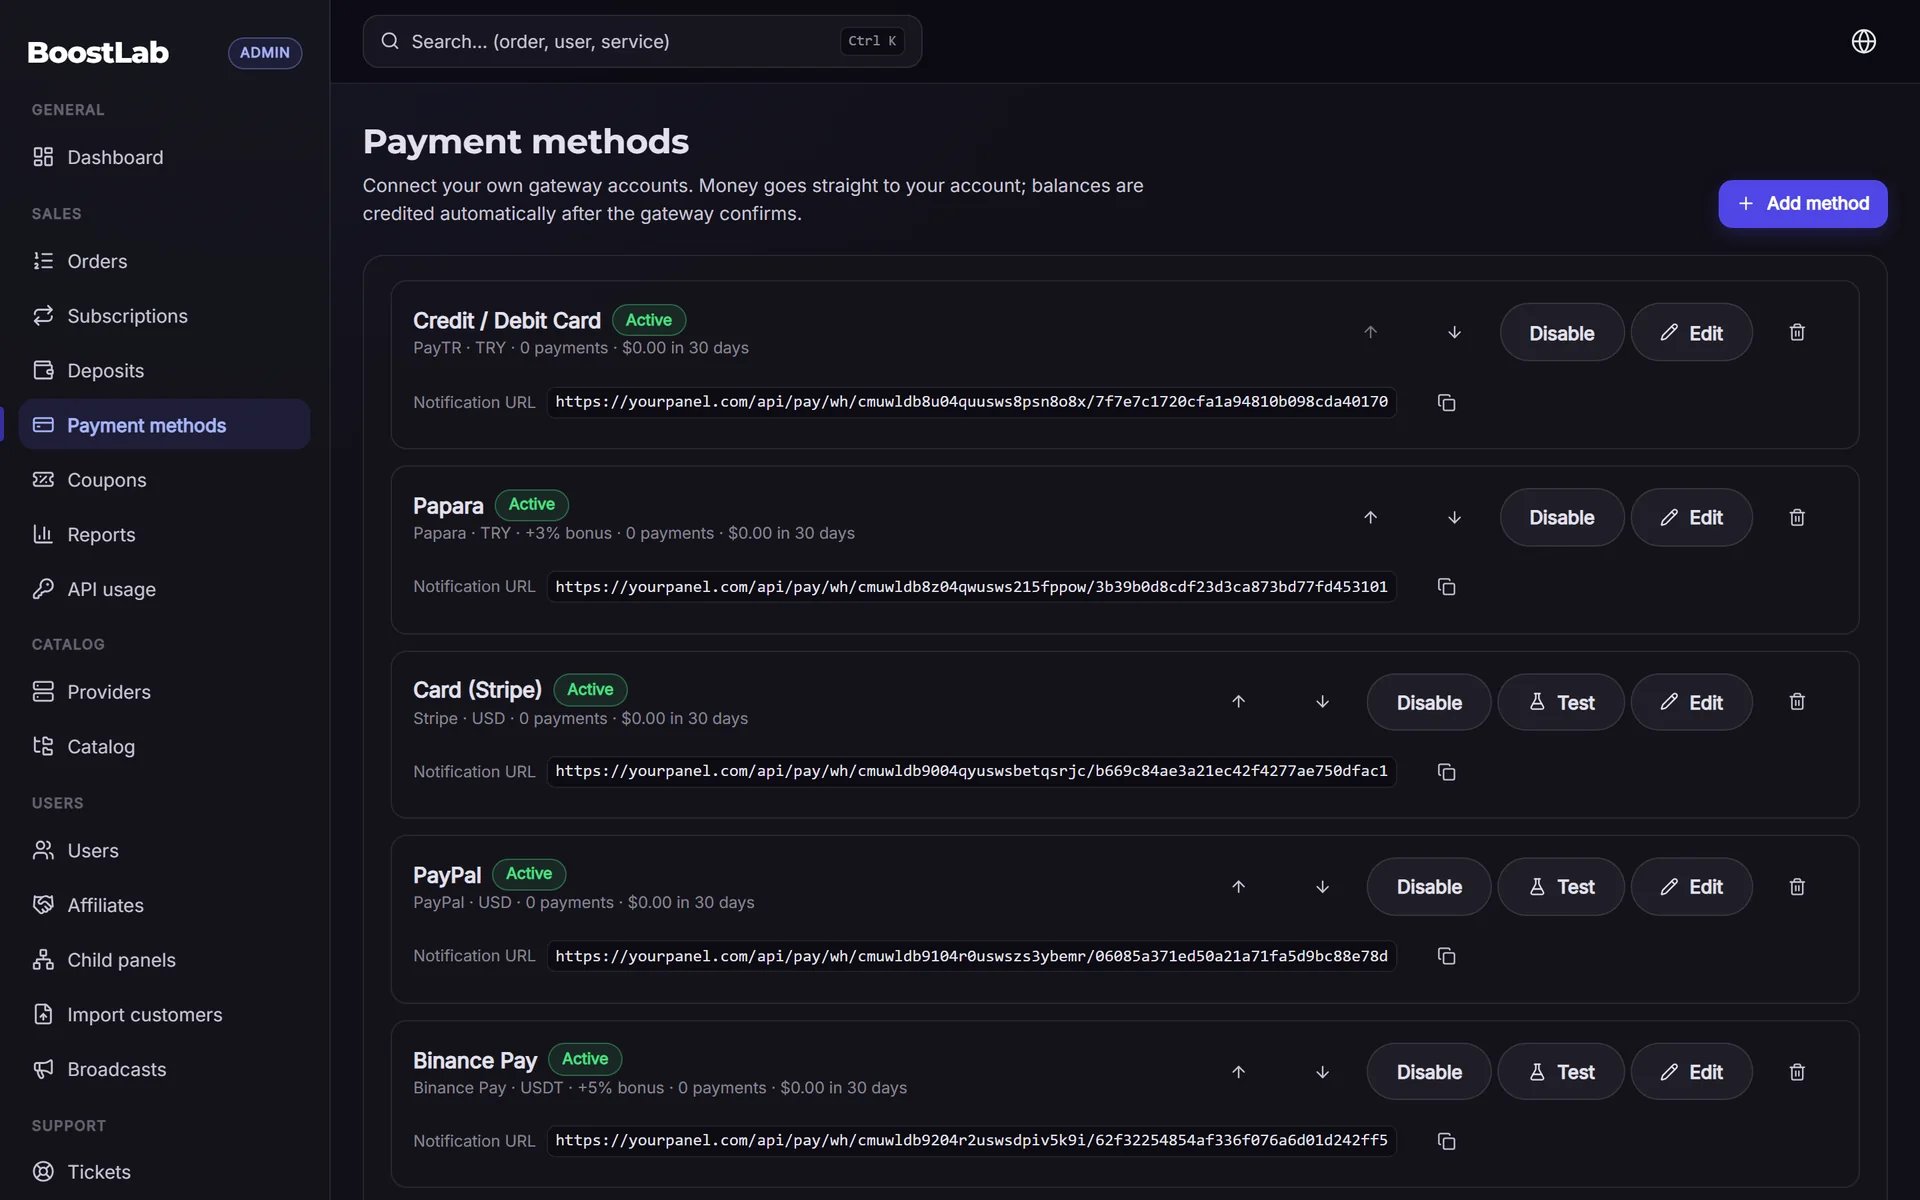
- Open Payment methods in the admin.
- Choose a gateway. SMMFor has 17+ built-in options including Stripe, PayPal, PayTR, iyzico, Papara, Binance Pay, Cryptomus, NOWPayments and others, plus manual or bank transfer methods. See payment gateways.
- Enter your gateway credentials. Saving them asks for 2FA. Money goes straight to your own gateway account, not to the platform.
- Copy the notification (IPN/webhook) URL shown on the method page into your gateway's dashboard, if the gateway requires it. Without it, payments may not be credited automatically.
- Set the basics: display name, charge currency, minimum and maximum amount, and any fee you pass to the customer.
- If the gateway has a sandbox or test mode, turn it on for your first test.
The easiest first method: manual transfer
If your gateway account is not approved yet, add a manual method with clear instructions (for example, bank details and what to write in the transfer description). Deposits through a manual method wait for your approval in the admin, which also makes it ideal for your first internal test.
The full comparison of gateways, fees and regional choices is in the payment methods chapter.
Step 8: Test deposit
Test as a customer would, not as an admin.
- Open your storefront in a private browser window.
- Register a new customer account with a different email from your admin email.
- Check that the welcome or verification email arrives.
- Go to Add funds and choose your payment method.
- Make a small deposit. With a gateway in test mode, use the gateway's test details; with a live gateway, deposit a small real amount; with a manual method, submit the deposit, then approve it in the admin.
- Confirm the balance appears on the customer account and the deposit appears in the admin.
If a gateway payment succeeds but the balance does not update, the notification URL is usually missing or wrong at the gateway side. Fix it before going further.
Step 9: Test order
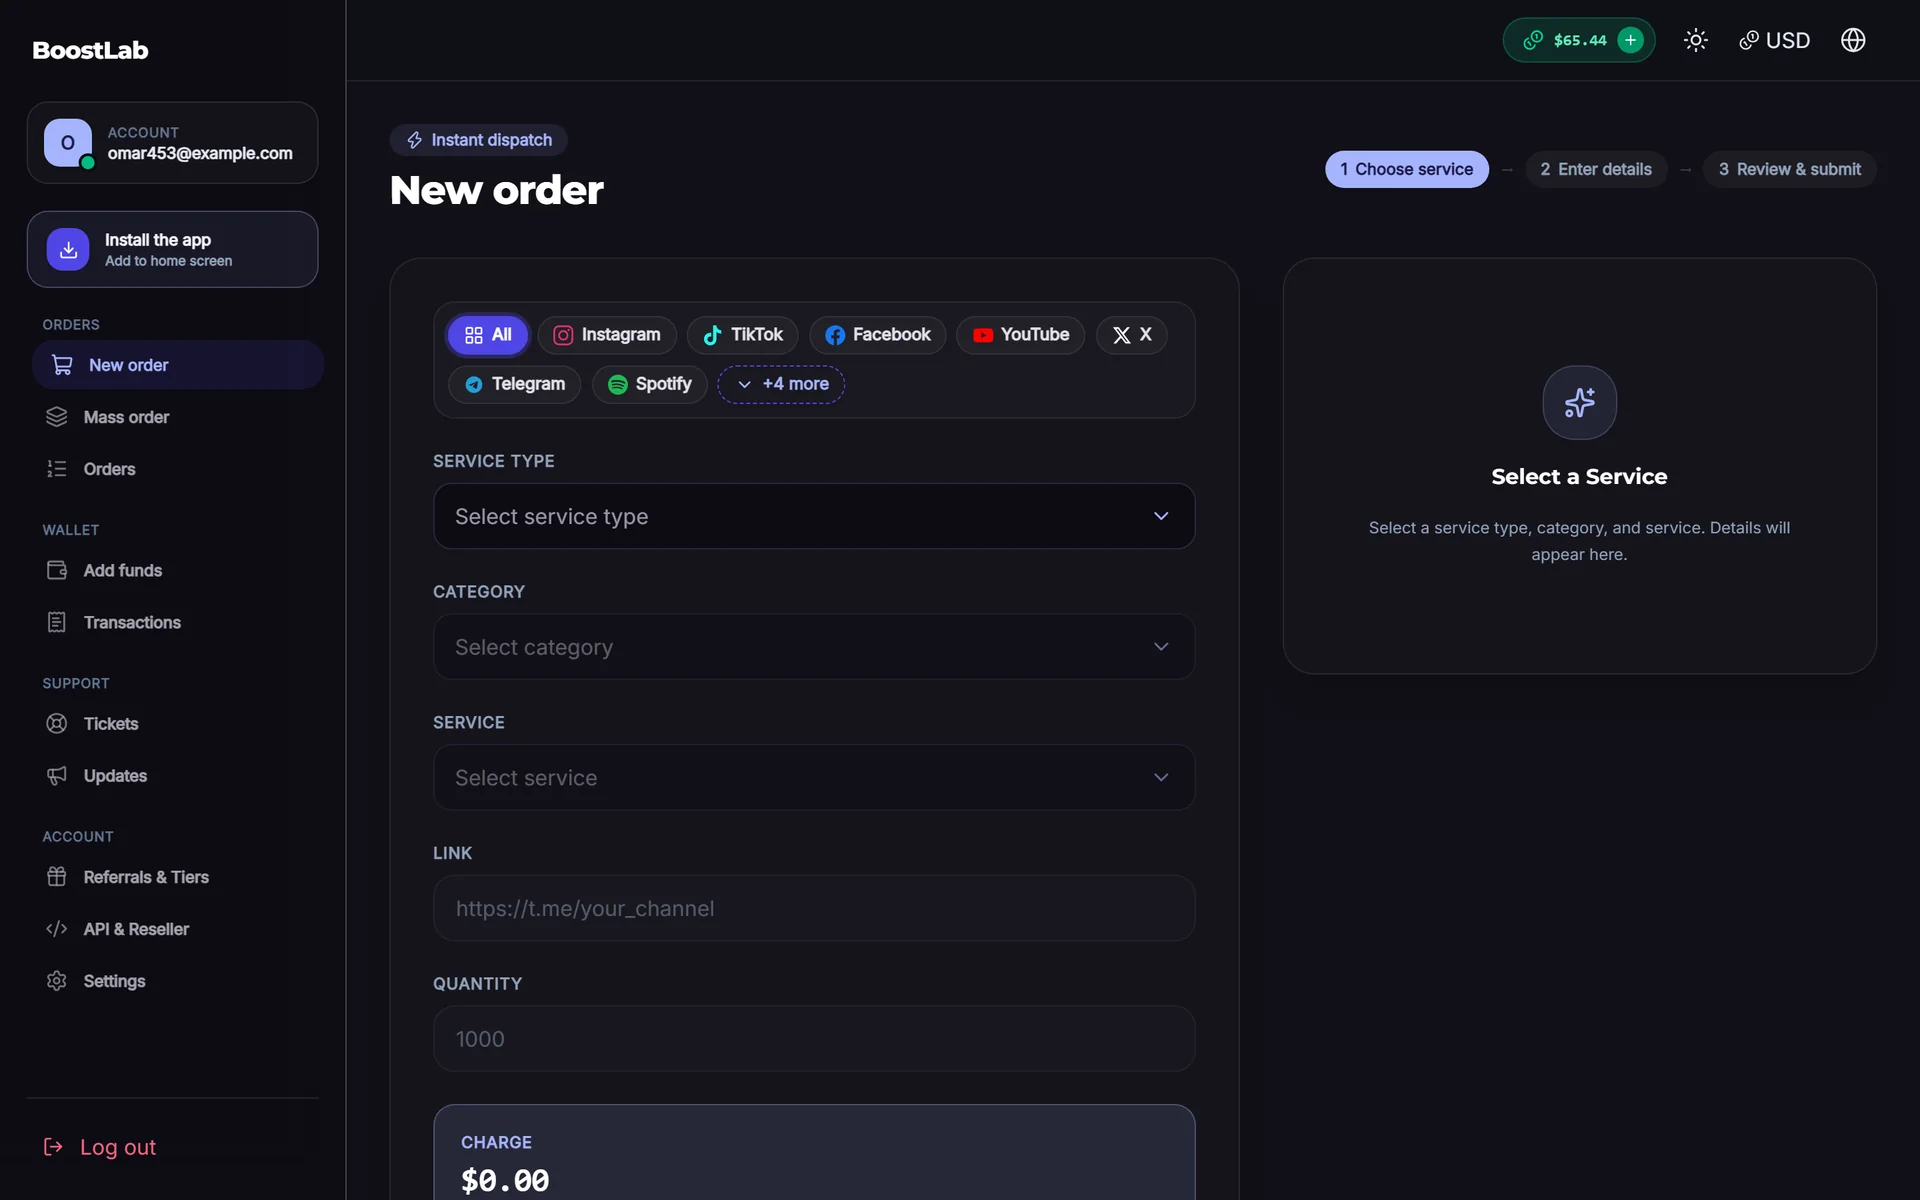
- In the customer panel, open New order.
- Choose one of your cheapest services and a target link you control, such as your own test account or channel.
- Enter the minimum quantity and place the order.
- In the admin, check that the order was sent to the provider and received a provider order ID.
- Watch the status change over the next minutes or hours. Order status syncs automatically with the provider.
- Repeat with a second service from a different category.
- If the service supports it, try a refill or cancel request to see the flow end to end.
Only place test orders on accounts you own. Platforms' terms may restrict bought engagement, so use a test account rather than an account that matters to you.
What a successful test looks like
| Check | Expected result |
|---|---|
| Deposit | Balance credited, deposit logged in admin |
| Order placed | Charged from balance at your selling price |
| Provider | Order created at provider, cost charged from your provider balance |
| Status | Moves from pending to in progress to completed (or partial) |
| Emails | Customer receives the expected notifications |
| Refund on partial | Unused amount returned to the customer balance |
Order statuses, refills, cancels and partial refunds are explained further in the order management chapter and in drip-feed, refill and cancel explained.
Step 10: Launch checklist
Go through this list before you share your panel publicly.
Technical
- Own domain connected and set as primary, SSL working (or a deliberate decision to launch on the subdomain).
- 2FA on for every admin and staff account.
- Provider connected, balance topped up for about the next two weeks of expected orders.
- A backup provider added for your most important services, if possible.
- Email sending works and messages do not land in spam.
Catalog and payments
- Only services you have tested or trust are visible.
- Every service has a clear name, description, minimum, maximum and refill information.
- Prices checked against provider costs and gateway fees.
- At least one payment method completed a real or test deposit end to end.
Trust and support
- Terms, refund policy and privacy policy published. See the legal chapter.
- Support tickets work; a direct contact channel is listed and answered.
- No demo text, placeholder images or broken links on the storefront.
- A short FAQ explaining how ordering, deposits and refills work.
Optional, but useful early
- Connect the Telegram bot for admin alerts such as low provider balance and pending manual payments. See Telegram bot.
- Enable a referral programme or a first-deposit coupon once the basics work.
- Open the customer API so resellers can connect; see the API and resellers chapter.
Common setup mistakes
- Importing the entire provider catalog. Hundreds of untested services mean hundreds of possible complaints.
- Skipping the test deposit. The most common launch problem is a payment that succeeds at the gateway but never reaches the customer balance.
- Testing only as admin. Admins see things customers do not; always test in a private window as a customer.
- Leaving the provider balance empty. Orders fail or wait, and the first customers leave.
- Forgetting 2FA. A compromised admin account can change payment details or drain balances.
- Launching with half-translated pages. Finish one language properly before adding another.
Moving from another panel script instead of starting fresh? See migration help; you can bring customers and services over rather than repeating every step by hand.
Next step
Your panel is set up and has passed its first real test. The next chapter goes deeper into the part customers interact with most: choosing, naming, describing and organising services. Continue with SMM panel services and catalog, or go back to the guide overview.
If you have not opened your panel yet, you can start with a 3-day free trial at smmfor.com/signup and follow this chapter step by step. The SMMFor documentation has screen-level detail for each setting.